Lesson 50: Herringbone to the left
26 de May de 2021Tutorial for Left Herringbone

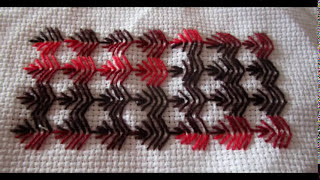
Here I present a new variation. I hope you like it. This is another pretty fancy stitch with the herringbone stitch as the main motif. It looks great on any valance, sheets, curtains or anywhere you want to decorate. A fantasy point that will be very fine where you put it. Follow each point that we have drawn step by step. It's the way you don't get lost. Dare to practice it!
Follow the video step by step and it will surprise you. You can use it both in borders, as in curtains, sheets, towels etc. or as a simple ornament point in one of your paintings. It is best to follow the video step by step here:
Materials
- You need a blunt needle. In your trusted haberdashery they can advise you on this.
- Thimble, we know that it is not easy to get used to it, but the earlier you adapt, the better, you will avoid many punctures.
- Special pearl or mouliné thread. Or you can also use fine crochet yarn
- Frame, there are made of wood, plastic and silicone. Lately I spend the silicone ones because I like them better, but that goes to taste.
- Light, the more the better and to be able to be natural
If you liked this lesson you can try some more of the ones we publish here
To see more videos of Herringbone, click here