LESSON 247: NORWICK STITCH. CANAMAZO. DIY. FANTASY STITCH.
2 de August de 2023Tutorial for Norwick Stitch:
Here’s the Tutorial for Norwick stitch. Another proposal of fantasy stitch in hemp stitch that we propose you at Bordarycantar.com.
What is it used for?
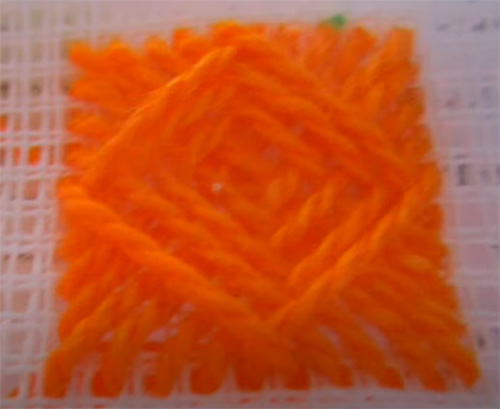
Flat square stitch with a woven appearance that can be worked on a square of any number of strands. It is suitable for medium to large areas and backgrounds, individual ornaments and geometric patterns.
You will cover as much space as possible if you work on a square with an unequal number of strands in each direction. If a square with an equal number of strands is used, a hemp mesh should be left empty in the center of each face.
How do you do that?
Start in the lower left corner.
Roda point diagram: Here is a sketch of Fig. A for better understanding.
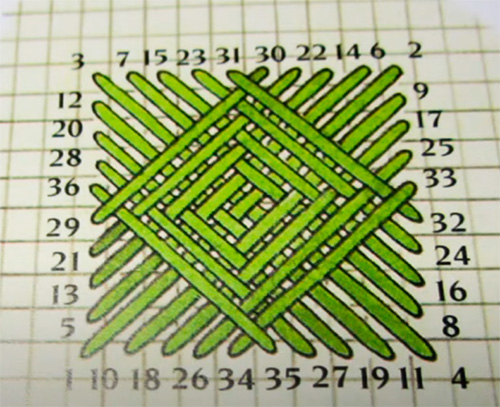
Fig. A: You will cover as much space as possible if you work over a square with an unequal number of strands in each direction; if a square with an equal number of strands is used, a hemp stitch should be left empty in the center of each face. Start in the lower left corner: pull the needle out at 1 and slip it in at 2 in the opposite corner. Next pull the needle out at 3, at the top left of the square, and slip it in at 4, making a large cross stitch. Then pull the needle out at 5, one st above 1, and slip it into 6, one st to the left of 2, making a parallel stitch from 1 to 2. Pull the needle out at 7, one st to the right of 3, and slip it into 8, one st above 4, making a parallel stitch from 3 to 4.
We continue with Fig. AThe next step is to pull the needle out at 9, one strand below 2, and slip it into 10, one strand to the right of 1, making another parallel stitch from 1 to 2. Pull the needle out at 11, one strand to the left of 4, and slip it into 12, one strand below 3, making another parallel stitch from 3 to 4. Continue in this way around the square until the holes on each side contain one strand. In a square of nine strands shown in each direction, the last stitch is 35 to 36. You may prefer to pass the needle under stitch 29-30 before bringing it into 36.
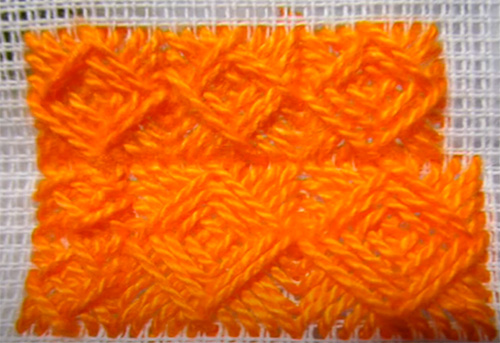
Here is a sample in various sizes. Try it yourself in several sizes and decide which one you like best.
Here is the Tutorial for Norwick stitch:
Embroidery materials punto Norwick:
- You need a sharp pointed needle. In your trusted haberdashery they can advise you on this.
- Canvas fabric
- Thimble, we know that it is not easy to get used to it, but the earlier you adapt, the better, you will avoid many punctures.
- Special thread for sewing. Or you can also use fine crochet yarn if it is to decorate something
- Frame, there are made of wood, plastic and silicone. Lately I spend the silicone ones because I like them better, but that goes to taste.
- Light, the more the better and to be able to be natural
If you liked this lesson of fantasy point.You can try some more of the ones we publish here