
LESSON 160: MEXICAN STITCH
16 de June de 2022Tutorial for Mexican Stitch:
Here’s the Tutorial for Mexican Stitchanother proposal of fantasy stitch that we propose you in Bordarycantar.com.
What is it used for?
It is used in open fill for medium to large areas. First work the lines of small vertical dots throughout the area, spacing them evenly.
How do you do that?
Fig. A: Using a blunt needle and the same or another color, draw out the needle in 1. Pass the needle through the first stitch of the top row and then through the first stitch of the bottom row. Repeat to the left and insert the needle in 2.
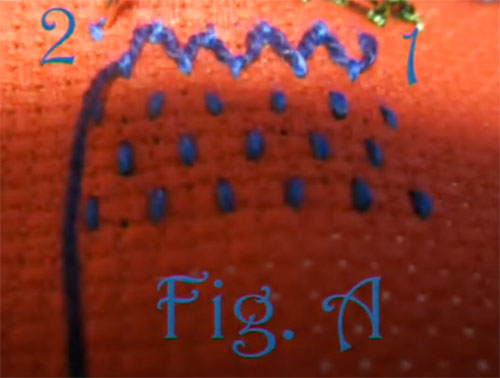
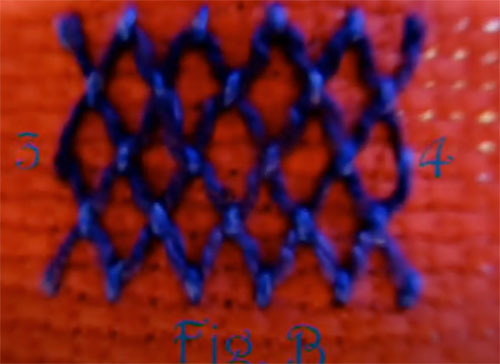
Fig. BFor the second row, pull out the needle at 3, pass it all the way to the right, through the small stitches, as in the drawing, and insert it at 4. Pull it out just above 4 to start the next row on the left.
Repeat this point as many times as necessary.
Here is the Mexican Stitch Tutorial:
Materials for sewing with the Portuguese Ribbing Stitch tutorial:
- You need a sharp pointed needle. In your trusted haberdashery they can advise you on this.
- Thimble, we know that it is not easy to get used to it, but the earlier you adapt, the better, you will avoid many punctures.
- Special thread for sewing. Or you can also use fine crochet yarn if it is to decorate something
- Frame, there are made of wood, plastic and silicone. Lately I spend the silicone ones because I like them better, but that goes to taste.
- Light, the more the better and to be able to be natural
If you liked this lesson of fantasy point.You can try some more of the ones we publish here