


Description
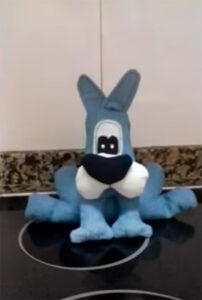
PATCHWORK 002- DOG
PATCHWORK DOG
Here are some more gift ideas: a dog made with the technique of the patchwork. They are dolls made of fabric. It has weight on the legs, so you can use it as a doorstop or as a paperweight. They are very original ideas. I hope you like them. Don't forget to share and like them. If you want more information you can visit the web: www.bordarycantar.com or write to: marisol@bordarycantar.com
Instructions for making a patchwork dog
- Draw the patterns on paper, cardboard, acetate... (whatever suits you best). Lately I use acetate, because it is transparent and I can see where I am going. It is not expensive and I like it better.
- Then take the fabric you have decided on and draw the outline of your patterns on the fabric inside out.
- Cut out the fabric leaving seam allowance. I usually leave a seam allowance of about 0.5 cm.
- Start by sewing the back. On the side that faces the body of the dog, leave a small hole there so that you can insert the stuffing and turn the fabric inside out.
- The central part will also have to have a hole for the stuffing and turn it around to match the head of the puppy. This way when you join all the parts together, it won't be noticeable.
- The head is only the oval where the eyes go. Apart from that, there are the ears, the white part of the muzzle and the black part is just another part.
- Here I have filled with cat litter the part of the back legs that touch the ground only, the rest is pillow stuffing. As with the cats, the part that touches the front parts, you have to leave the little hole to turn the fabric over and then stuff it.
- The part of the front paws, I have only filled with cat litter the part of what would be the nails, the rest filled with pillows.
- The oval of the head and parts of the muzzle, both white and black, stuffed with pillows. The ears, to keep them stiff, you have to put interlining.
- Leave a seam allowance of about 0.5 cm. In the angles and sharp curves, as in the jacks, give a few small cuts with scissors without reaching the seam, so that later they are well marked and do not give you problems. Make sure that everything is well stitched before turning over.
- When you have turned everything over, stuff and sew the holes where you have put the stuffing, except in the oval of the head, which before closing, you will have to put the ears so that everything is well connected.
- On the back legs, with a different color thread, I have marked a little bit the nails as three stitches.
- The next part is the front legs. Join them to the back part with a silicone gun and the part of the nails, also sewn as stitching with another color.
- Now the oval of the head. Start by attaching it to the front legs with the silicone gun, then on a felt, draw the eyes, just as I have put it and glue it to the centered oval with textile glue.
- The white part of the muzzle, you will have to glue it to the oval of the head with the silicone gun and in the central part you sew by hand some small black stitches that later will be attached to the black part of the muzzle. If you want, with a black marker, you can draw some little dots as hairs.
- And finally the black part of the snout, which will also be attached to the white part with a little hot silicone.
Patchwork puppy
Reviews
There are no reviews yet.